
|
AISpace2 | Main Tools | News | Downloads | Prototype Tools | Customizable Applets | Practice Exercises | Help | About AIspace |
|
|
Tutorials
Planning
Tutorial 4: Solving the PlanWhen the initial state and goals of a planning problem have been created (or loaded), select the "Solve" tab at the top of the control panel. In this mode, a tree is created as a visual representation of how the STRIPS planner works. Rectangular nodes represent actions oval nodes represent subgoals of the parent action. Red action nodes indicate that the action has not been added to the plan, and red goal nodes are goals that have not been achieved. Green action nodes have been added to the plan and green goal nodes have been achieved. Load the 'Simple Example' problem from the File menu. Initially, the tree consists of a root node labelled "Solved" and the initial goals are visualized as subgoals of the root action node, "Solved." Click the "Step" button to watch the algorithm attempt to find a plan by choosing actions to achieve all of the goals. Below is an example of what the 'Simple Example' graph will look like after you pressed "Auto Solve".  If you click on the "View Current Plan" button while the algorithm is running you will be able to see the actions that have been added to the plan at the current stage of the algorithm. The current plan dialog box is displayed below. 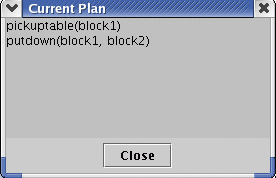 While the algorithm is running, you can also open the Current State window (Click "View Current State"). This window visually displays the current position of all the blocks and also shows the text representation of the current state, similar to the one below. 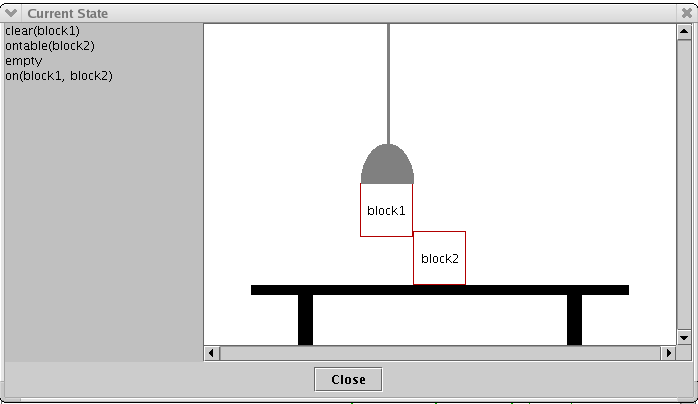 If the algorithm is able to find a plan, you may wish to view an animation of that plan by clicking the "Run Plan" button. This will open a window showing the initial state of the planning problem. You can then press the "Run Plan" button to begin the animation. To learn more about the STRIPS alogorithm used, you can go to Tutorial 5. |
| Main Tools: Graph Searching | Consistency for CSP | SLS for CSP | Deduction | Belief and Decision Networks | Decision Trees | Neural Networks | STRIPS to CSP |