
|
AISpace2 | Main Tools | News | Downloads | Prototype Tools | Customizable Applets | Practice Exercises | Help | About AIspace |
|
|
Tutorials
Planning
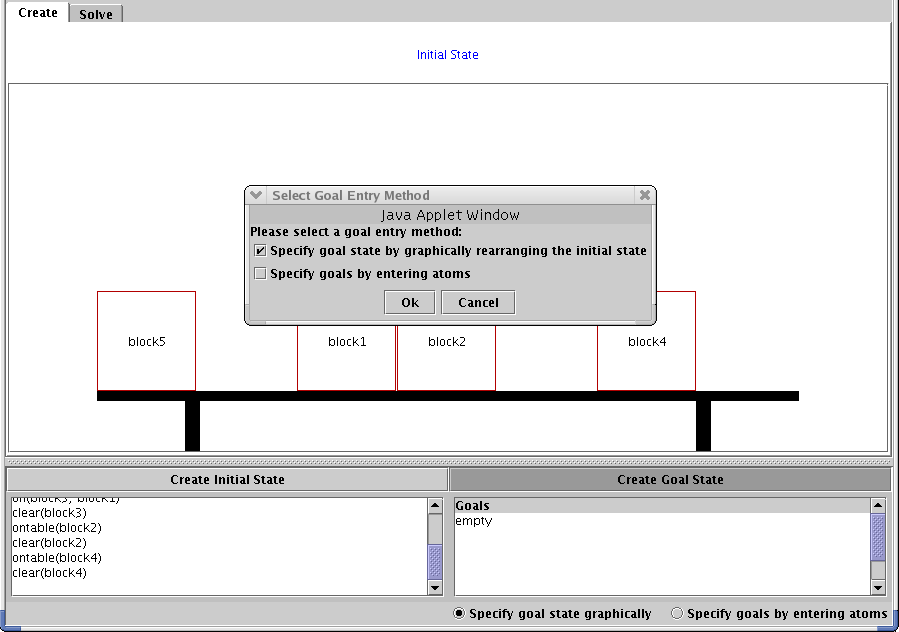
Tutorial 2: Creating a Goal StateWhen you are finished creating your initial state, you need to specify a goal state. The two ways of doing this are goals can be specified visually by rearranging the blocks of the initial state, or the goals can be specified by manually choosing goal atoms and terms. To create a goal state click on the button above the 'Goal State' panel. The first time you do this you will be prompted by a dialog box and you can choose how you want to specify goals. This will now be the setting whenever you go into the goal state. The screen should look like this:
 Creating Goals Visually You can move the blocks around the table and the other blocks. Notice how the goals display in the lower right corner text display change as you move the blocks. 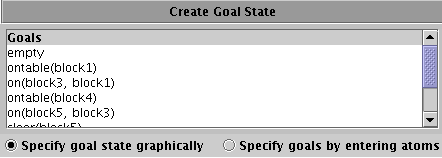 Creating Goals by Specifying Goal Atoms and Terms When you specify goals visually, the goals can sometimes be overspecified. You may only be concerned about a few block positions rather than the position of every block in the world. If you need more control over the goals, they can be entered individually instead of visually. In this case, select "Specify Goals" on the control panel and when asked to select a goal entry method, select the second option, "Specify Goals by Entering Atoms." If you are currently in visual goal specification mode, you can change the mode by choosing the radio buton "Specify Goals by Entering Atoms" at the bottom of the Goal State panel. There will now be two new buttons available on the button panel, "Add New Goal" and "RemoveGoals" Clicking "Add New Goal" opens a window that helps you specify goals. First choose from the available predicates in the drop-down list. If the predicate requires one or more terms, the window will update to display drop-down boxes you can use to select each term. If the term you need is a simple constant, a block, then just select the block name. If you would like to use a variable as a term, select "variable" from the drop down box. You will then be prompted for the name of the variable. When you have selected all required terms, click "Add Goal" to continue. The "Add Goal" dialog box will look similar to the one below: 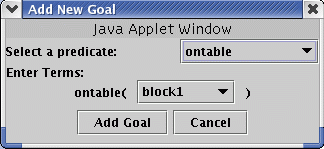 You can repeat this process as many times as necessary to specify your goals. If you would like to delete a goal, click the "Remove Goals" button to select the goals to remove. Combining Goal Entry Methods:In some cases, it may be convenient to combine goal entry methods. For example, you may want to define an initial state, rearrange the initial state to define a goal state, and then remove some goals that are not important to the problem you wish to define. In this case, proceed with defining the initial state and goal state in Visual Goal Entry mode. Then use the options menu to switch to "Specify Goals by Entering Atoms" mode. You can now fine-tune the goals using the control panel buttons "Remove Goals" and "Add Goals" In both methods, you can rearrange the order of the goals that the planner will try to solve for by clicking on 'Reorder Goals button. To adjust the order of a goal, select it with your mouse so that it is highlighted. Then click the "Move Goal Up" or "Move Goal Down" buttons to move the goal to the desired position. Goals closer to the top of the list will have priority. To learn how to create the goals for the plan to solve, see Tutorial 4 on solving. |
| Main Tools: Graph Searching | Consistency for CSP | SLS for CSP | Deduction | Belief and Decision Networks | Decision Trees | Neural Networks | STRIPS to CSP |